SAML2 – Spring Security 5.2 Tutorial
Published
Updated
Last updated on 08/10/2021
Introduction
While many utilize OAuth in lieu of SAML, SAML2 has its uses in large corporate environments and other legacy infrastructure. In this article, I’ll guide you on how to create a SAML2 identity provider and service provider using in Spring Boot 2.4 while utilizing the latest configuration methods available within Spring Security 5.2+.
Please note, some of the features outlined in this document utilize Spring’s SAML2 core milestone library, meaning they are subject to change upon actual implementation with the parent Spring Security project. I will do my best to keep this article updated as to provide you with the latest methodology for this rapidly evolving library.
If you have stumbled upon this page looking how to use the legacy spring-security-saml version 1 library, please note they are considered end of life and are in maintenance-only mode. This tutorial focuses on the newly rewritten version 2 library which now lives in the Spring Security project.
A Brief Overview of SAML
SAML stands for Security Assertion Markup Language. It was developed to manage and simplify the complexities surrounding access control of services, applications, and infrastructure.
Instead of each application having to manage its own credentials or username/password database, SAML provides a single authentication endpoint. From here, a user can log in once and then be granted access to any number of applications.
There are three different actors involved in SAML authentication:

- User Agent – A user or browser who is attempting to access a service or application.
- Identity Provider – Also known as an asserting party, this could be an organization such as Google or Facebook or it can be your own authentication service.
- Service Provider – Known as a relying party, this is any downstream application or service that the user is attempting to access. It could be a banking application, a web forum, a third party corporate application, or any of your own Spring Security applications.
Here is a real-world example of a SAML authentication flow within a large corporate environment:

- User attempts to access a service provider but they have not yet authenticated
- User is redirected or prompted for Active Directory credentials by the Identity Provider (user’s employer)
- The user provides correct credentials and the Identity Provider creates an assertion
- The assertion is provided back to the Service Provider and the user is now permitted access to the application
- Should the user attempt further access to any other Service Providers (applications) which trust the Identity Provider, they will be automatically be permitted to access and will not need to re-authenticate
Note: An assertion is an XML document containing various authentication information related to the user such as their username, email, privileges, etc.
Prerequisites
You will need the following:
- Maven installation
- Java Development Kit / Java Runtime version 8+ (Open JDK is preferred)
- Spring Boot 2.2 or greater
- Spring Security 5.2 or greater
- IDE of your choice. The project files are configured for IntelliJ
Generating Keys and Certificates
The following commands will generate all necessary keys and certificates for our identity and service providers:
# Generate a 2048-bit RSA Public / Private key pair
openssl req -newkey rsa:2048 -new -nodes -x509 -days 3650 -keyout private.key -out public.crt

# Convert the PKCS#8 format private-key to PKCS#1 unencrypted format
openssl rsa -in private.key -out rsaprivate.key
When prompted, provide the necessary details such as the state, province, city, organization, email, etc.
If you are having difficulty creating these certificates, the SAML x509 Cert Tool provided by OneLogin may help.
You should have three resulting files:
- private.key - an unencrypted RSA private key file in PKCS#8 format
- public.cer - a corresponding x509 self-signed certificate file
- rsaprivate.key - an unencrypted RSA private key in PKCS#1 format
In a real-world scenario, an identity provider will have its own private key and may hold the public certificate of its trusted service providers and vice versa for the service provider. However, if you are the owner of both, you can share the same public and private key across the identity and service providers. For simplicity’s sake, we will be reusing the same public and private keys for both providers.
Creating an Identity Provider
Create an empty Maven Spring Boot project or use Spring Initializr to create a boilerplate Maven / Spring Boot project.
Include the following dependencies in your pom.xml file:
<project xmlns="http://maven.apache.org/POM/4.0.0" xmlns:xsi="http://www.w3.org/2001/XMLSchema-instance"
    xsi:schemaLocation="http://maven.apache.org/POM/4.0.0 http://maven.apache.org/xsd/maven-4.0.0.xsd">

    <modelVersion>4.0.0</modelVersion>
    <groupId>com.codetinkering</groupId>
    <artifactId>identity-provider-example</artifactId>
    <version>0.0.1-SNAPSHOT</version>

    <parent>
        <groupId>org.springframework.boot</groupId>
        <artifactId>spring-boot-starter-parent</artifactId>
        <version>2.4.1</version>
    </parent>

    <properties>
        <java.version>1.8</java.version>
    </properties>

    <dependencies>
        <dependency>
            <groupId>org.springframework.security.extensions</groupId>
            <artifactId>spring-security-saml2-core</artifactId>
            <version>2.0.0.M31</version>
        </dependency>

        <dependency>
            <groupId>org.springframework.boot</groupId>
            <artifactId>spring-boot-starter-thymeleaf</artifactId>
        </dependency>

        <dependency>
            <groupId>org.springframework.boot</groupId>
            <artifactId>spring-boot-starter-web</artifactId>
        </dependency>

        <dependency>
            <groupId>org.springframework.boot</groupId>
            <artifactId>spring-boot-starter-security</artifactId>
        </dependency>

        <dependency>
            <groupId>org.thymeleaf.extras</groupId>
            <artifactId>thymeleaf-extras-springsecurity5</artifactId>
        </dependency>

        <dependency>
            <groupId>org.springframework.boot</groupId>
            <artifactId>spring-boot-starter-test</artifactId>
            <scope>test</scope>
        </dependency>

        <dependency>
            <groupId>org.springframework.security</groupId>
            <artifactId>spring-security-test</artifactId>
            <scope>test</scope>
        </dependency>
    </dependencies>

    <build>
        <plugins>
            <plugin>
                <groupId>org.springframework.boot</groupId>
                <artifactId>spring-boot-maven-plugin</artifactId>
            </plugin>
        </plugins>
    </build>
</project>
Create a java main class with a @SpringBootApplication annotation called ExampleIdentityProviderApplication.java:
package com.codetinkering.example;

import org.springframework.boot.SpringApplication;
import org.springframework.boot.autoconfigure.SpringBootApplication;

@SpringBootApplication
public class ExampleIdentityProviderApplication {

    public static void main(String[] args) {
        SpringApplication.run(ExampleIdentityProviderApplication.class, args);
    }

}
Create a boilerplate application configuration class marked with the @Configuration and @ConfigurationProperties annotations, calling it AppConfig.java:
package com.codetinkering.example.config;

import org.springframework.boot.context.properties.ConfigurationProperties;
import org.springframework.context.annotation.Configuration;
import org.springframework.security.saml.provider.SamlServerConfiguration;

@ConfigurationProperties(prefix = "spring.security.saml2")
@Configuration
public class AppConfig extends SamlServerConfiguration { }
Create a new configuration class which extends SamlIdentityProviderServerBeanConfiguration and override the getDefaultHostSamlServerConfiguration method. This class will direct the SAML library to your AppConfig class which will be populated by the application.yml file.
package com.codetinkering.example.config;

import org.springframework.context.annotation.Bean;
import org.springframework.context.annotation.Configuration;
import org.springframework.security.core.userdetails.User;
import org.springframework.security.core.userdetails.UserDetails;
import org.springframework.security.core.userdetails.UserDetailsService;
import org.springframework.security.provisioning.InMemoryUserDetailsManager;
import org.springframework.security.saml.provider.SamlServerConfiguration;
import org.springframework.security.saml.provider.identity.config.SamlIdentityProviderServerBeanConfiguration;

@Configuration
public class BeanConfig extends SamlIdentityProviderServerBeanConfiguration {
    private final AppConfig config;

    public BeanConfig(AppConfig config) {
        this.config = config;
    }

    @Override
    protected SamlServerConfiguration getDefaultHostSamlServerConfiguration() {
        return config;
    }

    @Bean
    public UserDetailsService userDetailsService() {
        UserDetails userDetails =
            User.withDefaultPasswordEncoder()
            .username("user") // This can be an email too
            .password("password")
            .roles("USER")
            .build();
        return new InMemoryUserDetailsManager(userDetails);
    }
}
Create a SecurityConfig class marked with the @EnableWebSecurity annotation. Within this class, we will have two subclasses which will extend the SamlIdentityProviderSecurityConfiguration and WebSecurityConfigurerAdapter classes.
package com.codetinkering.example.config;

import org.springframework.beans.factory.annotation.Qualifier;
import org.springframework.context.annotation.Configuration;
import org.springframework.core.annotation.Order;
import org.springframework.security.config.annotation.web.builders.HttpSecurity;
import org.springframework.security.config.annotation.web.configuration.EnableWebSecurity;
import org.springframework.security.config.annotation.web.configuration.WebSecurityConfigurerAdapter;
import org.springframework.security.saml.provider.identity.config.SamlIdentityProviderSecurityConfiguration;
import org.springframework.security.saml.provider.identity.config.SamlIdentityProviderSecurityDsl;

@EnableWebSecurity
public class SecurityConfig {

    @Configuration
    @Order(1)
    public static class SamlSecurity extends SamlIdentityProviderSecurityConfiguration {

        private final AppConfig appConfig;
        private final BeanConfig beanConfig;

        public SamlSecurity(BeanConfig beanConfig, @Qualifier("appConfig") AppConfig appConfig) {
            super("/saml/idp/", beanConfig);
            this.appConfig = appConfig;
            this.beanConfig = beanConfig;
        }

        @Override
        protected void configure(HttpSecurity http) throws Exception {
            super.configure(http);

            http.userDetailsService(beanConfig.userDetailsService())
                .formLogin();

            http.apply(SamlIdentityProviderSecurityDsl.identityProvider())
                .configure(appConfig);
        }
    }

    @Configuration
    public static class AppSecurity extends WebSecurityConfigurerAdapter {

        private final BeanConfig beanConfig;

        public AppSecurity(BeanConfig beanConfig) {
            this.beanConfig = beanConfig;
        }

        @Override
        protected void configure(HttpSecurity http) throws Exception {
            http.antMatcher("/**")
                .authorizeRequests()
                .antMatchers("/**").authenticated()
                .and()
                .userDetailsService(beanConfig.userDetailsService()).formLogin();
        }
    }
}
Create a controller class and mark it with a @Controller annotation to tie it all together:
package com.codetinkering.example.controller;

import org.springframework.stereotype.Controller;
import org.springframework.web.bind.annotation.RequestMapping;

@Controller
public class AppController {

    @RequestMapping(value = {"/"})
    public String selectProvider() {

        System.out.println("Select a service provider!");
        return "redirect:/saml/idp/select";
    }


}
Identity Provider SAML Configuration
We need to create an application.yml file which will contain our SAML configuration. Open your service provider’s public.cer file you created earlier and place the contents into the certificate section. Open your identity provider’s private.key file and place the contents in the private-key section. If your private key is protected with a passphrase, make sure to include or modify the passphrase value.
server:
  port: 8081
  servlet:
    context-path: /sample-idp

logging:
  level:
    root: INFO
    org.springframework.web: INFO
    org.springframework.security: INFO
    org.springframework.security.saml: TRACE
    org.opensaml.xmlsec: TRACE

spring:
  thymeleaf:
    cache: false
  security:
    saml2:
      network:
        read-timeout: 8000
        connect-timeout: 4000
      identity-provider:
        entity-id: codetinkering.com
        alias: boot-sample-idp
        sign-metadata: true
        sign-assertions: true
        want-requests-signed: true
        signing-algorithm: RSA_SHA256
        digest-method: SHA256
        single-logout-enabled: true
        name-ids:
          - urn:oasis:names:tc:SAML:2.0:nameid-format:persistent
          - urn:oasis:names:tc:SAML:1.1:nameid-format:emailAddress
          - urn:oasis:names:tc:SAML:1.1:nameid-format:unspecified

        keys:
          active:
            name: active-idp-key
            private-key: |
              -----BEGIN RSA PRIVATE KEY-----
              MIICXwIBAAKBgQDOrqSss0JeHX/EjI4a88UHl6QBNR8tnPJ4zhi/8uwcfEaS1Ah7
              B8Xeb+APY1aydpnMdFbVcr8fjLyOf65xNncMgSP63yx9+VXM+YqQm/jr1qQSEJSK
              jxntVbN4PfaNQoy1BkVkw7vI4TvHcPmCHHqxeMETcbDU/qeY6ZqGJCVv1QIDAQAB
              AoGBAJqf4acqfS54F0xucyoK0Y76jcIxgd/YGTbzyWRhUu+Esi/K3YVdrVTakeAx
              S308aZeiOgx6Si5KVg6ty037l1e0mM2oNr1DsGf2pMmZdHBB2YzbMHx4rsE1PHNh
              VJV7qgoxaxhBe+wH+1cSKbtP6ayftGSQpmLhv9csn/yijweBAkEA9gXpMP5lNMIB
              o0nNO28o5dhgOxtgD6LmxC/IlHb6WvkwVogc7CwC4UFBmlh6ahMroMk1Ul/5Gjax
              KZtgkBITRQJBANcQUJojgBBPBW8aN+TrKTa7DlHryR1cYx8AtkiqF4DViX4uvbRZ
              KUcwnCLLBb743CT3cCgNJCeCjxGxgpEZ61ECQQDBd7p+hb9uspX5I6NZ9rtRrEtY
              j9mF0lPoua7hWYLdIZKqqZUdACsvmlKNnsB9RCAN68ybv88zlwjQsFhKU3yFAkEA
              h1kYMPmYlir1M4ffl208Idq1V285wgWryA4tqiuJ4SYCguwtrbvTU59PFEKLWjXK
              bmVfK4WhtE/hdHQvxNv4EQJBAIlqSufr6kQ/NyOvZZXFN5J5akbC2ptjRJhhMdwT
              BidbSgC1IOmPtFopPCttmJ12/JZQzBuIM/UEqhEhAB+48Hs=
              -----END RSA PRIVATE KEY-----
            passphrase:
            certificate: |
              -----BEGIN CERTIFICATE-----
              MIICrjCCAhegAwIBAgIBADANBgkqhkiG9w0BAQ0FADB0MQswCQYDVQQGEwJ1czEL
              MAkGA1UECAwCZmwxDTALBgNVBAoMBHRlc3QxDTALBgNVBAMMBHRlc3QxDTALBgNV
              BAcMBHRlc3QxDTALBgNVBAsMBHRlc3QxHDAaBgkqhkiG9w0BCQEWDXRlc3RAdGVz
              dC5jb20wHhcNMjEwMTA3MTkzNTE4WhcNMjIwMTA3MTkzNTE4WjB0MQswCQYDVQQG
              EwJ1czELMAkGA1UECAwCZmwxDTALBgNVBAoMBHRlc3QxDTALBgNVBAMMBHRlc3Qx
              DTALBgNVBAcMBHRlc3QxDTALBgNVBAsMBHRlc3QxHDAaBgkqhkiG9w0BCQEWDXRl
              c3RAdGVzdC5jb20wgZ8wDQYJKoZIhvcNAQEBBQADgY0AMIGJAoGBAM6upKyzQl4d
              f8SMjhrzxQeXpAE1Hy2c8njOGL/y7Bx8RpLUCHsHxd5v4A9jVrJ2mcx0VtVyvx+M
              vI5/rnE2dwyBI/rfLH35Vcz5ipCb+OvWpBIQlIqPGe1Vs3g99o1CjLUGRWTDu8jh
              O8dw+YIcerF4wRNxsNT+p5jpmoYkJW/VAgMBAAGjUDBOMB0GA1UdDgQWBBSdkXuF
              7PJkHO2ZE3puJtReS/9I1zAfBgNVHSMEGDAWgBSdkXuF7PJkHO2ZE3puJtReS/9I
              1zAMBgNVHRMEBTADAQH/MA0GCSqGSIb3DQEBDQUAA4GBALPQCrG/BO9+zNArQC+k
              Rkq3OhhA4Bg6T2ijwLtYw+mLlULrC4mA6Rds1XLXTuivYu58rcL4cTcdO16VOyxe
              tgkqewOJOsqFtbEf/fo0spLra0ng/bxDNvZkQh2Xwk2HWCTE4+U7K1asrBhmpm19
              3uuLc5Y9leWtF3cRAxyB41ry
              -----END CERTIFICATE-----
        providers:
        - alias: spring-security-saml-sp
          metadata: http://localhost:8080/sample-sp/saml2/service-provider-metadata/samlexample
          linktext: Spring Security SAML SP
There is a lot going on here, let’s break down the important pieces:
Set these to true if you want the metadata to be encrypted and validated via x509 mutual auth (otherwise set them to false if you want to skip the mutual authentication configuration):
- sign-metadata
- sign-assertions
- want-requests-signed
The following are your urns which will contain all the user identifiers via the assertion:
urn:oasis:names:tc:SAML:2.0:nameid-format:persistenturn:oasis:names:tc:SAML:1.1:nameid-format:emailAddress
The providers section contains all the aliases and service providers that your identity provider can authorize. You will likely need to modify the metadata value to the hostname of your service provider application. Note: you can have multiple providers listed within this section.
Note on SAML2 Single Logout (SLO)
As of Spring Security 5.5, the full implementation of Single Logout is not yet available, and it will be released in the upcoming Spring Security 5.6 release. As of the 5.6.0-M2 milestone, it appears that SLO will be enabled by default. Additionally, you will be able to configure the Saml2 Asserting Party and Relying Party Initiated Logouts via the RelyingPartyRegistration builder by calling .singleLogoutServiceLocation("{baseUrl}/saml2/logout/your-registration-id") . Additionally, you can create custom logoutHandlers so that this IDP logout happens automatically like so:
    @Bean
    SecurityFilterChain web(HttpSecurity http, LogoutHandler logoutHandler, LogoutSuccessHandler successHandler) throws Exception {

        http
            .saml2Login(withDefaults())
            .logout((logout) -> logout
                .logoutRequestMatcher(new AntPathRequestMatcher("/saml2/logout/your-registration-id", "GET"))
                .addLogoutHandler(logoutHandler)
                .logoutSuccessHandler(successHandler)
            );
Identity Provider Page Templates
Create a Thymeleaf template called saml-post.html which will serve as a landing page to redirect older browsers:
<!DOCTYPE html>
<html xmlns="http://www.w3.org/1999/xhtml" xmlns:th="http://www.thymeleaf.org" xmlns:sec="http://www.thymeleaf.org/thymeleaf-extras-springsecurity5">
<head>
    <title>Spring Security 5.2 - SAML 2 Example</title>
    <meta charset="utf-8" />
</head>
<body onload="document.forms[0].submit()">
<noscript>
    <p>
        <strong>Note:</strong> Please click continue if you are not redirected automatically.
    </p>
</noscript>

<form th:action="${url}" method="POST">
    <div>
        <input th:if="${RelayState != null}" type="hidden" name="RelayState" th:value="${RelayState}"/>
        <input th:if="${SAMLResponse != null}" type="hidden" name="SAMLResponse" th:value="${SAMLResponse}"/>
        <input th:if="${SAMLRequest != null}" type="hidden" name="SAMLRequest" th:value="${SAMLRequest}"/>
    </div>
    <noscript>
        <div>
            <input type="submit" value="Continue"/>
        </div>
    </noscript>
</form>
</body>
</html>
Create a Thymeleaf template called select-provider.html which will display the list of available service providers:
<!DOCTYPE html>
<html xmlns="http://www.w3.org/1999/xhtml" xmlns:th="http://www.thymeleaf.org" xmlns:sec="http://www.thymeleaf.org/thymeleaf-extras-springsecurity5">
<head>
    <title>Spring Security 5.2 - SAML 2 Example</title>
    <meta charset="utf-8" />
</head>
<body style="background-color: sky; color: navy;">
<h1>Select a Service Provider</h1>
<div>
    <ul>
        <li th:each="sp : ${sps}">
            <a th:href="${sp.redirect}"><span style="font-weight:bold" th:text="${sp.linkText}"/></a>
        </li>
    </ul>
</div>
</body>
</html>
Creating a Service Provider
Create an empty Maven Spring Boot project or use Spring Initializr to create a boilerplate Maven / Spring Boot project.
Include the following dependencies in your pom.xml file:
<?xml version="1.0" encoding="UTF-8"?>
<project xmlns="http://maven.apache.org/POM/4.0.0"
         xmlns:xsi="http://www.w3.org/2001/XMLSchema-instance"
         xsi:schemaLocation="http://maven.apache.org/POM/4.0.0 http://maven.apache.org/xsd/maven-4.0.0.xsd">
    <modelVersion>4.0.0</modelVersion>

    <groupId>com.codetinkering</groupId>
    <artifactId>spring-security-saml2-service-provider-example</artifactId>
    <version>1.0-SNAPSHOT</version>

    <parent>
        <groupId>org.springframework.boot</groupId>
        <artifactId>spring-boot-starter-parent</artifactId>
        <version>2.4.1</version>
    </parent>

    <properties>
        <java.version>1.8</java.version>
    </properties>

    <dependencies>

        <dependency>
            <groupId>org.springframework.security</groupId>
            <artifactId>spring-security-saml2-service-provider</artifactId>
        </dependency>

        <dependency>
            <groupId>org.springframework.security</groupId>
            <artifactId>spring-security-config</artifactId>
        </dependency>

        <dependency>
            <groupId>org.thymeleaf.extras</groupId>
            <artifactId>thymeleaf-extras-springsecurity5</artifactId>
        </dependency>

        <dependency>
            <groupId>org.springframework.boot</groupId>
            <artifactId>spring-boot-starter-thymeleaf</artifactId>
        </dependency>

        <dependency>
            <groupId>org.springframework.boot</groupId>
            <artifactId>spring-boot-starter-web</artifactId>
        </dependency>

    </dependencies>

    <build>
        <plugins>
            <plugin>
                <groupId>org.springframework.boot</groupId>
                <artifactId>spring-boot-maven-plugin</artifactId>
            </plugin>
        </plugins>
    </build>

</project>
Create a java main class with a @SpringBootApplication annotation called ExampleServiceProviderApplication.java:
package com.codetinkering.example;

import org.springframework.boot.SpringApplication;
import org.springframework.boot.autoconfigure.SpringBootApplication;

@SpringBootApplication
public class ExampleServiceProviderApplication {
    public static void main(String[] args) {
        SpringApplication.run(ExampleServiceProviderApplication.class, args);
    }
}
Your service provider will require a controller, create one and create a single mapping to an index Thymeleaf template:
package com.codetinkering.example.controller;

import org.springframework.stereotype.Controller;
import org.springframework.web.bind.annotation.GetMapping;

@Controller
public class AppController {

    @GetMapping("/")
    public String index() {
        return "index";
    }
}
Finally, lets create a SecurityConfig class which will modify Spring Security’s filter chain. In addition to defining which paths are protected by our SAML2 authentication filter, it will also enable the Metadata Provider Endpoint which serves up a metadata xml file via a URL. http://localhost:8080/sample-sp/saml2/service-provider-metadata/samlexample
package com.codetinkering.example.config;

import org.springframework.beans.factory.annotation.Autowired;
import org.springframework.context.annotation.Configuration;
import org.springframework.core.convert.converter.Converter;
import org.springframework.security.config.annotation.web.builders.HttpSecurity;
import org.springframework.security.config.annotation.web.configuration.WebSecurityConfigurerAdapter;
import org.springframework.security.saml2.provider.service.metadata.OpenSamlMetadataResolver;
import org.springframework.security.saml2.provider.service.registration.RelyingPartyRegistration;
import org.springframework.security.saml2.provider.service.registration.RelyingPartyRegistrationRepository;
import org.springframework.security.saml2.provider.service.servlet.filter.Saml2WebSsoAuthenticationFilter;
import org.springframework.security.saml2.provider.service.web.DefaultRelyingPartyRegistrationResolver;
import org.springframework.security.saml2.provider.service.web.Saml2MetadataFilter;

import javax.servlet.http.HttpServletRequest;

import static org.springframework.security.config.Customizer.withDefaults;

@Configuration
public class SecurityConfig extends WebSecurityConfigurerAdapter {

    @Autowired
    RelyingPartyRegistrationRepository relyingPartyRegistrationRepository;

    @Override
    protected void configure(HttpSecurity http) throws Exception {

        Converter<HttpServletRequest, RelyingPartyRegistration> relyingPartyRegistrationResolver =
                new DefaultRelyingPartyRegistrationResolver(this.relyingPartyRegistrationRepository);

        Saml2MetadataFilter filter = new Saml2MetadataFilter(
                relyingPartyRegistrationResolver,
                new OpenSamlMetadataResolver());

        http
            .saml2Login(withDefaults())
            .addFilterBefore(filter, Saml2WebSsoAuthenticationFilter.class)
            .antMatcher("/**")
            .authorizeRequests()
            .antMatchers("/**").authenticated();
    }
}
Spring Security Assertion Consumer Service
If you are looking for Spring’s Assertion Consumer Service url, it would be derived using the following property:
{baseUrl}/login/saml2/sso/{registrationID}
Which translates in this example to:
http://localhost:8080/sample-sp/login/saml2/sso/samlexample
You can modify this URL using the following yaml:
spring:
  security:
    saml2:
      relyingparty:
        registration:
          samlexample:
            acs:
              location: "{baseUrl}/login/saml2/sso/samlexample"
Service Provider SAML Configuration
Within our application.yml file, we setup our relying party registration to our identity provider:
server:
  port: 8080
  servlet:
    context-path: /sample-sp

logging:
  level:
    root: DEBUG
    org.springframework.web: INFO
    org.springframework.security: INFO
    org.springframework.security.saml: INFO
    org.opensaml.xmlsec: TRACE

spring:
  security:
    saml2:
      relyingparty:
        registration:
          samlexample:
            signing:
              credentials:
                - private-key-location: "classpath:credentials/private.key"
                  certificate-location: "classpath:credentials/public.cer"
            identityprovider:
              entity-id: codetinkering.com
              singlesignon:
                sign-request: false
                url: http://localhost:8081/sample-idp/saml/idp/select
              metadata-uri: http://localhost:8081/sample-idp/saml/idp/metadata
Copy the private.key and public.cer files created in previous steps and place them within a folder named credentials within our project’s resources folder. This allows our keys and certs to be available to our application via Java’s classpath loader.
In this configuration, I have disabled the request signing via the sign-request parameter. Should you want this feature enabled, you can change this value to true. It should be noted that depending on your identity provider configuration, you may need to leave this set to false.
Service Provider Page Template
Add the following to your templates directory of your app’s resources folder:
<!doctype html>
<html xmlns="http://www.w3.org/1999/xhtml" xmlns:th="https://www.thymeleaf.org" xmlns:sec="https://www.thymeleaf.org/thymeleaf-extras-springsecurity5">
<head>
<title>Spring Security SAML2</title>
</head>
<body style="background-color: aquamarine;">
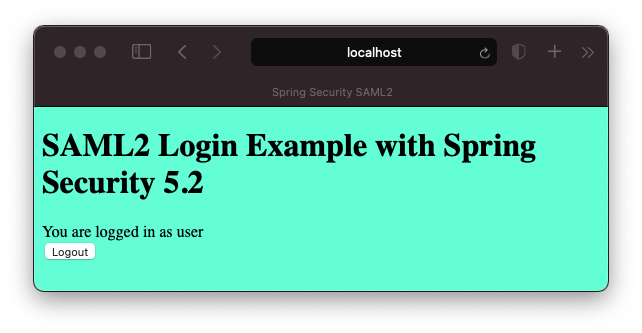
<h1>SAML2 Login Example with Spring Security 5.2</h1>
<div>You are logged in as <span sec:authentication="name"></span></div>
<div>
<form th:action="@{/logout}" method="post">
<input type="submit" value="Logout" />
</form>
</div>
</body>
</html>
This is a simple page which will show the username of the user who is logged in, along with a logout button which will sign the user out of the identity provider.
Putting it all together
Build both applications and then start the Identity Provider followed by the Service Provider.
You will then be able to access the service provider localhost:8080/sample-sp/ which take you to an identity provider selection page for authentication:
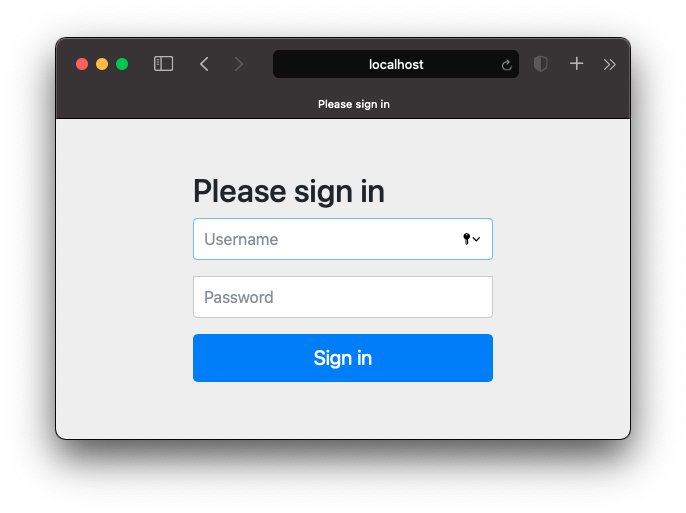
Provide the following credentials:
- username:
userpassword:password
You will then be redirected back to the service provider and be able to view the protected page:
Checkout this project from Github
git clone https://github.com/code-tinkering/saml2-tutorialDownload Zip
Common Pitfalls and Issues
On the “Select a Service Provider” page, I don’t see any results:
- Make sure the metadata provider url is correct. *In the example it is defined as
samlexample - The last part of the metadata URL needs to match the definition in your service provider’s application.yml file.
I get the error ‘Invalid signature for SAML Response’
- Ensure the entity-id parameter in your application.yml matches the entity-id provided by your identity provider. This is usually in the format of a domain name. Should these not match, your service provider will not trust the IDP. You may see the error ‘Failed to verify signature using KeyInfo-derived’ within the console if you have trace enabled.

org.bouncycastle.asn1.pkcs.PrivateKeyInfo cannot be cast to class org.bouncycastle.openssl.PEMKeyPair
- This happens when you provide a PKCS#8 key to your Identity Provider instead of one in the format of PKCS#1. Make sure that your private key starts with
-----BEGIN RSA PRIVATE KEY-----and not-----BEGIN PRIVATE KEY-----.
Invalid destination X for SAML response Y
This an OpenSAML error and it happens when the Identity Provider’s response’s URL, scheme, hostname, or port don’t match what is configured for the relying party (service provider) registration. See getAssertionConsumerServiceLocation() within org.springframework.security.saml2.provider.service.registration.RelyingPartyRegistration.class in your debugger and compare values to the Response parameter within the method validateResponse() in the class org.springframework.security.saml2.provider.service.authentication.OpenSamlAuthenticationProvider.class.
Invalid assertion X for SAML response Y
Chances are your assertion is invalid, contains junk or you are getting bad data from your identity provider. Double check that your conditions, subject confirmations, and statements are correct and valid.